
 前往官网


 发布
CAN 控制器接口
模块功能介绍
X1600芯片内集成2组独立的CAN控制器;每组CAN控制器支持的功能如下:
支持CAN 2.0A和CAN 2.0B协议
支持最高1Mbps位速率
具有4个硬件接收滤波器
支持监听模式
支持self-loop自测模式
驱动源码位置
驱动源码所在位置:
module_drivers/drivers/net/can/ingenic/ingenic_can.c
设备树配置
设备树所在位置
kernel内核(version <= 5.10)dts文件路径:
module_drivers/dts-stage/x1600/x1600.dtsi
kernel内核(version > 5.10)dts文件路径:
module_drivers/dts/x1600/x1600.dtsi
CAN控制器描述
can0: can@0x13560000 {

 compatible = "ingenic,x1600-can";

 reg = <0x13560000 0x10000>;

 status = "okay";

 interrupt-parent = <&core_intc>;

 interrupts = <IRQ_CAN0>;

 dmas = <&pdma INGENIC_DMA_TYPE(INGENIC_DMA_REQ_CAN0_TX)>,

 <&pdma INGENIC_DMA_TYPE(INGENIC_DMA_REQ_CAN0_RX)>;

 dma-names = "tx", "rx";

 #address-cells = <1>;

 #size-cells = <0>;

};

can1: can@0x13570000 {

 compatible = "ingenic,x1600-can";

 reg = <0x13570000 0x10000>;

 status = "okay";

 interrupt-parent = <&core_intc>;

 interrupts = <IRQ_CAN1>;

 dmas = <&pdma INGENIC_DMA_TYPE(INGENIC_DMA_REQ_CAN1_TX)>,

 <&pdma INGENIC_DMA_TYPE(INGENIC_DMA_REQ_CAN1_RX)>;

 dma-names = "tx", "rx";

 #address-cells = <1>;

 #size-cells = <0>;

};
设备树默认配置
设备树默认关闭CAN控制器设备。
设备树自定义配置
用户可根据实际需求关闭CAN控制器设备,例如:
&can0 {

 status = "disable";

 pinctrl-names = "default";

 pinctrl-0 = <&can0_pd>;

 ingenic,clk-freq = <24000000>;

};

&can1 {

 status = "disable";

 pinctrl-names = "default";

 pinctrl-0 = <&can1_pd>;

 ingenic,clk-freq = <24000000>;

};
内核编译配置
内核配置INGENIC_CAN,配置说明如下:
Symbol: INGENIC_CAN [=y]

Type : tristate

Prompt: ingenic on-chip CAN support

 Location:

 -> Ingenic device-drivers Configurations

 -> [CAN] (ethernet) Drivers

 -> INGENIC CAN support

Defined at module_drivers/drivers/net/can/ingenic/Kconfig
内核默认编译配置
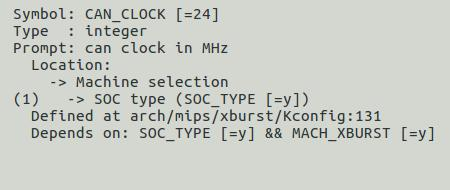
内核默认配置,配置界面如下:

在内核配置波特率时需配置CAN_CLOCK、CAN_CLOCK应与设备树CAN总线时钟保持一致:
内核自定义编译配置
用户可根据实际需求,去掉该驱动的配置。
模块内核差异
无
设备节点生成
驱动加载成功后,执行ifconfig -a会出现can0或者can1.
\# ifconfig -a

can0 Link encap:UNSPEC HWaddr 00-00-00-00-00-00-00-00-00-00-00-00-00-00-00-00

 NOARP MTU:16 Metric:1

 RX packets:0 errors:0 dropped:0 overruns:0 frame:0

 TX packets:0 errors:0 dropped:0 overruns:0 carrier:0

 collisions:0 txqueuelen:10

 RX bytes:0 (0.0 B) TX bytes:0 (0.0 B)

 Interrupt:48

can1 Link encap:UNSPEC HWaddr 00-00-00-00-00-00-00-00-00-00-00-00-00-00-00-00

 NOARP MTU:16 Metric:1

 RX packets:0 errors:0 dropped:0 overruns:0 frame:0

 TX packets:0 errors:0 dropped:0 overruns:0 carrier:0

 collisions:0 txqueuelen:10

 RX bytes:0 (0.0 B) TX bytes:0 (0.0 B)

 Interrupt:49

lo Link encap:Local Loopback

 inet addr:127.0.0.1 Mask:255.0.0.0

 UP LOOPBACK RUNNING MTU:65536 Metric:1

 RX packets:0 errors:0 dropped:0 overruns:0 frame:0

 TX packets:0 errors:0 dropped:0 overruns:0 carrier:0

 collisions:0 txqueuelen:1

 RX bytes:0 (0.0 B) TX bytes:0 (0.0 B)
应用程序使用说明
can连接方式
芯片内集成CAN控制器,但还不能进行通讯。CAN控制器需要连接转发器,然后发送给另一个CAN设备的转发器;
转发器连接时。CAN_H连接CAN_H,CAN_L连接CAN_L。当连线出现问题时,会报can bus error错误。
正常模式测试
设置位速率
设置位速率需要在CAN设备使能之前进行;
设置1Mbps位速率
# ip link set can0 type can bitrate 1000000

# ip link set can1 type can bitrate 1000000
该方法内核会自动计算要设置的位速率,目前内核驱动支持的波特率为1M、500K、250K、100K、50K。用户也可添加自己需要的波特率,详情参考x1600 PM手册。
注意事项:用户如需配置20K、10K等波特率时,时钟源需选择外部24M时钟。
使能can设备
使能can0 和 can1 设备
# ifconfig can0 up

# ifconfig can0 up
设置can1接收数据
# candump can1 &
设置can0发送数据
分别发送标准帧,扩展帧和远程帧
# cansend can0 -i 0x123 0x11 0x22 0x33 0x44 0x55 0x66 0x77 0x88

# cansend can0 -i 0x12345 -e 0x11 0x22 0x33 0x44 0x55 0x66 0x77 0x88

# cansend can0 -i 0x123 -r 0x11 0x22 0x33 0x44 0x55 0x66 0x77 0x88
关闭can设备
关闭can0 和 can1 设备
# ifconfig can0 down

# ifconfig can1 down
查看can状态
查询 can0 设备的参数设置
# ip -details link show can0
在设备工作中,查询can0的工作状态
# ip -details -statistics link show can0
使用self-loop方式测试
该测试会在控制器内部将tx和rx进行短接,将tx的数据直接送到rx上。
测试不需要连接can设备。
设置can位速率并启动loop模式
# ip link set can0 type can bitrate 1000000 loopback on
启动can
# ifconfig can0 up
设置can接收
# candump can0 &
can发送数据
# cansend can0 -i 0x123 0x11 0x22 0x33 0x44 0x55 0x66 0x77 0x88
关闭can设备
# ifconfig can0 down